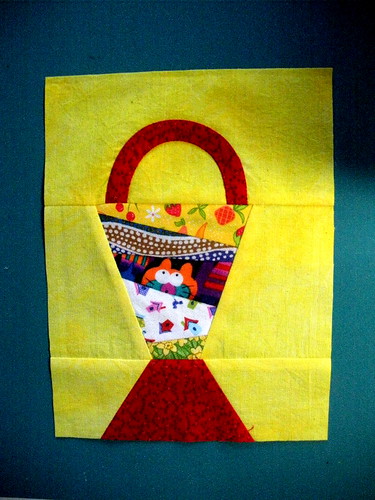
I put these tips together for the Block Lotto, to help everyone produce nice flat curved handles for their Liberated Basket blocks. This technique works for any bias appliqué strips: stems, vines, branches etc.
When it comes to quilting, we are usually taught to avoid working with bias edges, using STEAM when pressing and pulling/contorting our fabrics. But sometimes, all of these things can work for you to achieve the desired effect.
Here's a closer look at the steps for making the basket handle. Click any of the photos for a larger image and add your own tips in the comments.
- Be sure to cut your strips ON THE TRUE BIAS. Do NOT fudge on this step. Align the 45 degree line on your ruler with the selvedge or cut edge of your fabric to find the bias line across your fabric.
- Sew the bias strip into a tube by sewing the two long edges together, WRONG SIDES together. Don't even finger press the fold and you won't have to worry about getting rid the crease you create. Thread color doesn't matter (notice my not so "neutral" light gray.) After you've sewn the seam, trim away the seam allowance as close as you can to the seam–after the bias is in place, there will be no stress on that seam.
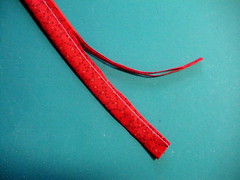
- Now, carefully prepare the sewn bias strip. Roll the seam and it's tiny seam allowance between your fingers so that the seam is in the middle of the strip. Take the strip to the iron and press it firmly so that it is VERY flat.
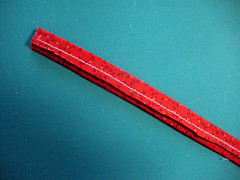
- Next, using the STEAM in your iron, "swirl" the strip. This technique I learned when making hats. It's how you create the shape of the grosgrain ribbon that rests against the head inside the hat. Since your head isn't a cylinder, the ribbon needs to wider at the bottom than the top, by swirling the ribbon into a slight curve, you create a ribbon that measures longer on one side than the other and fits beautifully inside a hat and against the head.
It works like this: using a STEAM iron in one hand to anchor one end of the strip to the ironing board and holding the other end of the strip in your other hand to manipulate the strip. As you press along the length of the bias strip, you'll be stretching one edge slightly to create a curved shape.

Depending on the angle at which you pull the strip around, you coulcome very close to creating the shape you want for your handle at the ironing board. I was able to completely form my handle at the ironing board.
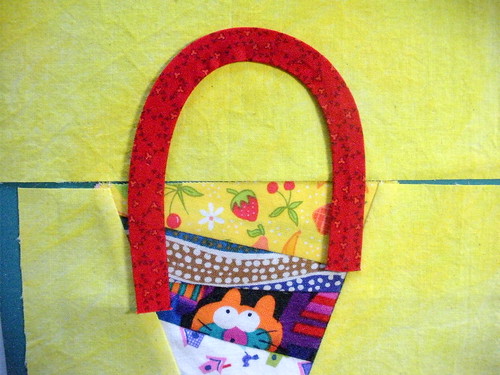
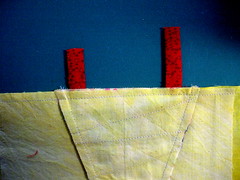
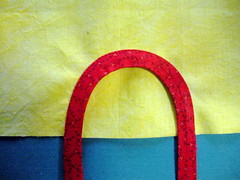
- Pin the handle in place, focusing on the OUTSIDE of the handle first. Use as many or few pins as you need. If you are stitching your handle down on the machine, be sure to remove the pins as you come upon them.
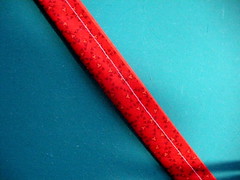
- When machine stitching the handle, be sure to use a thread color that matches or invisible thread. Use an open sewing machine foot that will allow an open view of the needle/seam and the edge of the handle. If you can change the needle position on your machine, take advantage of that feature to sew as close to the edge of the handle as you can. On my little Bernina (153 QE), I used a #10 appliqué foot and moved my need to the far right.
If you are using a straight stitch, as I did here, you want to be close to the edge while staying on the bias strip If you are using a blind stitch, blanket stitch or zigzag, you'll also want to be close to the edge, but stitching along the background (and zigging into the handle).
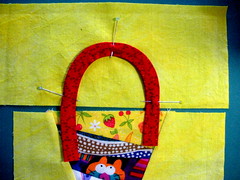

- After you have stitched down the outside, you may notice that the background has pulled in a little. You also now have an opportunity to work on the inside curve with the STEAM iron. so, press the strip again, with STEAM, starting with the curviest part of the handle works the excess fabric into the straighter/more gently curved areas so it doesn't get tucks in it. Pulling the edge down/pressing towards the bottom of the block rather than perpendicular to the stitching on the outer edge shortens the fabric in the inside curve to help it lay smoothly as well.
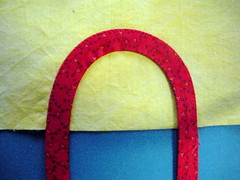
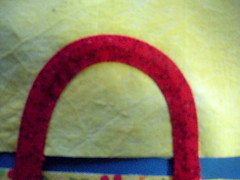
- When you have pressed and manipulated the handle so that it lies flat, you're ready to stitch down the inside curve. Once again, you want to sew as close to the edge as you can. Upon close examination, your stitching will highlight the beautiful, smooth curve (with all edges appearing to be turned under– something I learned to think about in a Jane Sassaman workshop from some years ago.
Once your handle is completed, attach it to the bottom of the basket block, trimming the excess length of handle even with the fabric edge. I generally sew first and trim later to ensure that the ends of the strips don't have any possibility of folding up and getting in the way in the seam and . . . not lying flat when I'm done.