
Flying Geese units are typically twice as wide as they are tall. The finished size of my examples is 2 by 4 inches. They were used as the star points in the 8 inch Sawtooth Star blocks we made for the lotto in October, 2007.
Cutting Fabrics
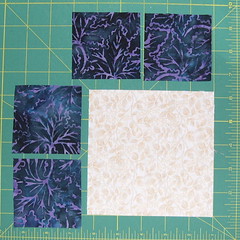
For each set of four geese, you'll need:
- one square of the geese fabric which is 1-1/4 inches larger than the finished width of the geese unit (i.e., 5-1/4 for 2 x 4 inch geese)
- four squares of sky fabric which are 7/8 inch larger than the finished height of the geese unit (2-7/8 inches for 2 x 4 geese).
Sewing the Units
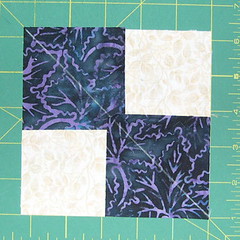
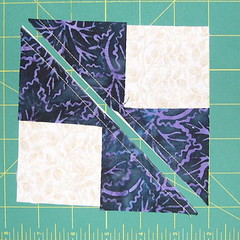
Putting right sides together, line up the edges of two of the small squares with the edges of two diagonal corners of the large square. Draw a line, across both small squares from corner to corner.
Stitch 1/4 inch on each side of the drawn line. Then cut along the line.
Press the seams toward the dark fabric.
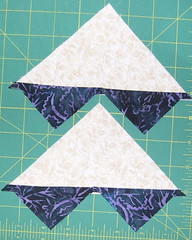
For each half, align a small square in the corner.right sides together. Draw a diagonal line.
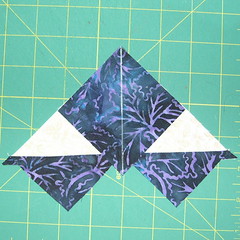
Stitch 1/4 inch on each side of the drawn line. Then cut along the line.
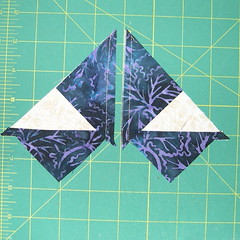
Press the seams toward the dark fabric. You're done.
9 comments:
Thanks for this and the other tutorials, Sophie - it makes it a lot easier to understand when there's pictures of each step.
ooo- you are so smart! I am going to try that. First thing tomorrow.
How clever are you? Thanks for making my life easier--you need to be in our quilt group!
Christy from Utah
Wow, that is smart, I am certainly going to give it a try! Thank you...
This must be one of the cleverest tutorials I have seen! Thank you very much. I found you through the link in Eileen's blog.
Hi there! I've been using that method for years now. Thanks for showing it.
Deb Tucker http://www.datquiltlady.com
has been teaching that method in all her class for quite a while. Makes it SO much eaiser!
Ryan @ Catskill Country Cupboard
thanks so much for this brilliant way to do these. I love flying geese but hate having to cut off the corners and wasting them. This way there is no waste at all. Brilliant!!
Fabulous oldie but goodie!!
Thanks, great tutorial,
Post a Comment